

In my previous posts, I had written about HTML and some of its features. I had defined HTML (HyperText Markup Language) as the structure of a web page, in other words, the building blocks of a web page. Some people prefer to refer to HTML as the Skeleton of every web page.
If HTML is just a building block or skeleton for a web page (or website), what then is/are the other layer(s)?🤔
For a full functioning (alive) web page to be developed you need: HTML(HyperText Markup Language), CSS, and Javascript (or any other programming language).
In this article, we'll discuss CSS.
If you're new to this blog and have no idea what HTML this click: Introduction to HTML
Introduction
What exactly is CSS?🤷
CSS (Cascading Style Sheet) is a Styling Language for creating designs for ".html" documents. It determines how the web page (or website) will look as well as its display.
A short History of CSS is that CSS is developed by the World Wide Web Consortium (W3C) and its initial release date was 17 December 1996.
Why use CSS?
CSS allows you to apply specific styles to HTML elements. It allows separating style from content.
Types of CSS
CSS has 3 types with different method of application but the same uses. They are:
- The Inline CSS.
- The Internal CSS.
- The External CSS.
The Inline CSS: Refers to embedding the CSS property inside a specific tag as an attribute of that tag. This is done by adding the "style" attribute. Syntax: Adding color to a heading<h1 style="color: red;">Introduction to CSS</h1>
The Internal CSS: Are defined within the<style>element, inside the head section of an HTML page. The CSS properties are inserted inside the<style>element. For example: Adding Background color to the page.
Syntax:<!DOCTYPE html> <html lang="en"> <head> <meta http-equiv="CONTENT-TYPE" content="text/html; charset=UTF-8"> <title>CSS</title> <style> body { background-color: indigo; } </style> </head> <body> <h1> Introduction to CSS </h1> </body> </html>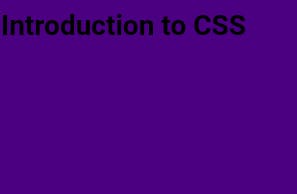 External CSS: With this method, all styling rules and properties are contained in a single text file, which is saved with the ".css" file extension. The
 <link>tag is then used to refer or link the CSS file to the HTML file. The<link>element goes inside the head section. Example: Adding background color and text color to h1.
Syntax: HTML
CSS<!DOCTYPE html> <html lang="en"> <head> <meta http-equiv="CONTENT-TYPE" content="text/html; charset=UTF-8"> <title>CSS</title> <link rel="stylesheet" href="jhndx.css"> </head> <body> <h1> Introduction to CSS </h1> </body> </html>body { background: black; } h1 { background: blue; color: red; }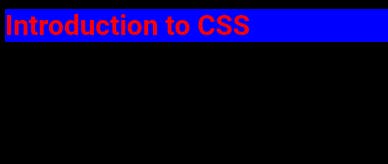
CSS Syntax
CSS has some style rules that the browsers understand, interpret, and applies to the corresponding element in any document involved. The style rule has its format as "selector {property: value;}" (selector, property and value). E.g:h1 { color: red;}where h1 is the selector, color as the property and red is the value. NOTE: The curly braces can contain more than one property and value. Each property and value is separated by semi-colons ";".Types of selectors
- Type selector: Targets the element types on the page. The various contents of the element used as selector will be affected through out the page. E.g if
pis used as selector, every paragraphs on the page will be given the properties and values used within the curly braces. - Id and Class selectors: Id (Identity) and Class (classification) are attributes of an element. For id selector, the "#" symbol is used, followed by the "name" attributed to the id, i.e
<p id="name">...and the styles will be (#name {property: value;} ). For the class selector, the "." sign is used, followed by the name, i.e (.name {property: value; ). - Descendant selector: Used to select elements that are nested by another element. It can be used for elements whose levels are deep nested. E.g For
<li>nested by<ul>and<nav>=>nav ul li { property: value; }. Same for the Id and Class descendants, but the "#" and "." signs must not be ignored.
NOTE: The Id can only be used once while the class can be used multiple times. This is because the Id is Unique and shares not its properties. The Id is capable of overriding every other selectors.
Conclusion
CSS being a styling language for HTML consists of numerous features that I won't be mentioning in this article but in my next articles. Tap the follow button to see my next articles as soon as I post.
You can get more of everything mentioned above from W3schools.
If you have any question or requests about what I've written you can drop it down in the comment section.
Please, do well to Like😊